28 Days To Your First Race
This will guide you through everything you need to know to get ready to compete in your first bike race.
Day 1 – We recommend you start this on a Sunday
Day 1 – We recommend you start this on a Sunday
Watch Intro to Road Bike Racing Webinar
Watch Intro to Road Bike Racing Webinar
This webinar will take you through A LOT of info your need to know before you jump into your first race. Everything from finding a race, to basic race strategy, to learning how to best avoid a crash (this tends to be what scares a lot of people about racing).
Next
Workout for the Day
Workout for the Day
Workout Duration: 30 minutes
Workout Description: Very easy spinning (active recovery), working on pedal stroke technique. Unsure of proper technique? Make sure you know out the Perfect Pedal Stroke EP.
Workout Focus: Learning proper pedal stroke and making sure are recovered heading into your Functional Threshold Assessment that is 2 days away.
Be sure to hit the post workout stretching listed below.
Next
Post Activity Stretching!
Post Activity Stretching!
We suggest you watch this video and memorize these stretches for post activity stretching. We will give you a comprehensive routine you can also use on recovery days.
Next
Maximize Sleep
Maximize Sleep
Sleep is performance’s best friend. You have to have the recovery in order to see the gains. The training makes you tired – the recovery is what makes you stronger as a result of the training.
Over the course of this program, look to get 7-8 hours of sleep each night at a minimum. This is best done by going to bed and waking up at the same time each day, 7 days a week. Just make it part of your daily routine and get that body in a proper sleeping rhythm. It may be a challenge initially, but make it happen.
Next
Day 2 – Priming the System
Day 2 – Priming the System
Workout for the Day – Leg, Lung, and Heart Openers
Workout for the Day – Leg, Lung, and Heart Openers
Workout Duration: 60 minutes
Workout Description:
- 15 minute warm-up: Hit 3×1 minute fast spins beginning at the 6 min mark. 1 min easy spin between efforts.
- 40 minute main set: Spin at an endurance effort, something you could maintain over a 2+ hour ride. Every 5 minutes, add in a 30 second surge in effort at a high cadence. This should get the legs burning, but should not be max. Repeat every 5 minutes.
- 5 min cool down: Gradually decrease effort and allow heart rate to fall.
Workout Focus: Prime the legs, lungs, and heart for tomorrow’s threshold test without putting too much fatigue in the system. Reinforce proper pedal stroke mechanics.
Be sure to hit the post workout stretching listed below.
Next
Day 3 – Assessment and Zones
Day 3 – Assessment and Zones
Workout for the Day – Functional Threshold Assessment
Workout for the Day – Functional Threshold Assessment
Today is “assessment” day. Don’t stress out about this, all that is needed is to try your best. There aren’t any grades that will be handed out, instead it’s just used to accurately set your zones and chart future progress (especially if you have a power meter).
Here’s the workout details, or you can follow along with the video by scrolling to the bottom.
[15 minute warm up]
- Spin at a sub-moderate effort for the first 6 minutes.
- Complete 3x 1 minute fast spins at a high effort level, with 1 minute recovery between each effort.
- Spin at a sub-moderate effort for the next 4 minutes. Begin mentally preparing for the first effort.
[5 min VO2 effort]
- At the 15 minute mark, you will go as hard as you can for 5 minutes. Pace yourself on this and look to put out a consistent effort throughout. Do not hold back! Chamois time is hammer time! Make sure you look at what your lap average was for heart rate and/or power.
[10 min recovery]
- Keep the legs moving after that 5 min full gas effort. Goal here is for maximal recovery, but we don’t want your legs tightening up. Keep them moving! Effort should be about a 2-3 out of 10 for this.
[20 min Threshold effort]
- Your best 20 min output is the goal here. Everything you have. Stay mentally and physically focused during this – it hurts so good! Make sure you look at what your lap average was for heart rate and/or power. This number will be used to determine your threshold.
[Cool down and stretch]
- Minimum of 5 minutes of light spinning to let the heart rate gradually fall and to help clear the legs of all that blood lactate that accumulated during this assessment.
- Spend at least 10 min stretching post workout.
Next
What Each Zone Means
What Each Zone Means
The rest of your workouts are going to have “zones” associated with your intensity levels.
Take a few minutes and set your zones, then print them out and tape them to your handlebars.
As a reminder, here are the descriptions for each zone:
1 – Active Recovery: “Easy spinning” or “light pedal pressure”, i.e., very low-level exercise, too low in and of itself to induce significant physiological adaptations. Minimal sensation of leg effort/fatigue. Requires no concentration to maintain pace, and continuous conversation possible. Typically used for active recovery after strenuous training days (or races), between interval efforts, or for socializing.
2 – Endurance – “All day” pace, or classic long slow distance (LSD) training. Sensation of leg effort/fatigue generally low, but may rise periodically to higher levels (e.g., when climbing). Concentration generally required to maintain effort only at the highest end of the range and/or during longer training sessions. Breathing is more regular than at level 1, but continuous conversation still possible. Frequent (daily) training sessions of moderate duration (e.g., 2 h) at level 2 possible (provided dietary carbohydrate intake is adequate), but complete recovery from very long workouts may take more than 24 hrs.
3 – Tempo – Typical intensity of fartlek workout, ‘spirited’ group ride, or briskly moving paceline. More frequent/greater sensation of leg effort/fatigue than at level 2. Requires concentration to maintain alone, especially at the upper end of range, to prevent effort from falling back to level 2. Breathing deeper and more rhythmic than level 2, such that any conversation must be somewhat halting, but not as difficult as at level 4. Recovery from level 3 training sessions more difficult than after level 2 workouts, but consecutive days of level 3 training still possible if the duration is not excessive and dietary carbohydrate intake is adequate.
4 – Lactate Threshold – Just below to just above TT effort, taking into account duration, current fitness, environmental conditions, etc. Essentially continuous sensation of moderate or even greater leg effort/fatigue. Continuous conversation difficult at best, due to depth/frequency of breathing. Effort sufficiently high that sustained exercise at this level is mentally very taxing – therefore typically performed in training as multiple ‘repeats’, ‘modules’, or ‘blocks’ of 10-30 min duration. Consecutive days of training at level 4 possible, but such workouts generally only performed when sufficiently rested/recovered from prior training so as to be able to maintain intensity.
5 – V02 Max – Typical intensity of longer (3-8 min) intervals intended to increase VO2max. Strong to severe sensations of leg effort/fatigue, such that completion of more than 30-40 min total training time is difficult at best. Conversation not possible due to often ‘ragged’ breathing. Should generally be attempted only when adequately recovered from prior training – consecutive days of level 5 work not necessarily desirable even if possible. Note: At this level, the average heart rate may not be reliable due to delayed heart rate response and/or ceiling imposed by maximum heart rate.
6 – Anaerobic Capacity – Short (30 s to 3 min), high-intensity intervals designed to increase anaerobic capacity. Heart rate generally not useful as a guide to intensity due to non-steady-state nature of the effort and delayed heart rate response. Severe sensation of leg effort/fatigue, and conversation impossible. Consecutive days of extended level 6 training usually not attempted.
7 – Neuromuscular Power – Very short, very high-intensity efforts (e.g., jumps, standing starts, short sprints) that generally place greater stress on musculoskeletal rather than metabolic systems. Power useful as a guide, but only in reference to prior similar efforts, not TT pace.
(These zone descriptions are taken from Andy Coggan, Ph.D., the man who literally wrote the book on training with power.)
Next
Set Your Heart Rate Zones
Set Your Heart Rate Zones
Use your best average 20-30 min HR or 20 min average from your FTP test in the calculator below.
Next
Set Your Power Zones
Set Your Power Zones
Type your average 20 min power from your FTP test in the calculator below:
Next
Day 4 – Rest Day and Equipment Discussion
Day 4 – Rest Day and Equipment Discussion
Equipment Options for Road and Crit Racing
Equipment Options for Road and Crit Racing
Equipment (from head to toe):
- Helmet – Mandatory – You must have a US DOT and/or CPSC approved helmet (there should be a sticker inside the helmet). As a heads up, when you are at the race venue, you MUST have a helmet on anytime you are on your bike. So even if you are cruising your bike to the port-o-john, you must have it on. Failing to do so will likely get you yelled at by an official and they also have the option to disqualify you. Here’s a link to the USA Cycling Rule Book regarding helmets.
- Sunglasses – Optional – It’s in your best interest to wear eye protection. In the event that a rock gets kicked up, or a bug flies into your eye, or someone in front of you decides to blow a mean snot rocket, you’ll want those eyeballs protected.
- Jersey with Sleeves – Mandatory – Notice that you must have sleeves on your top of choice. You will see most racers wearing a full zip jersey. It’s also ideal to make sure your jersey has pockets in the back for holding race nutrition. Note: Per rule 1J5.e – “No rider shall wear the emblem, inscription, or uniform of any club or team which the rider is not eligible to represent.” So no wearing your favorite pro team jersey.
- Gloves – Optional – Gloves are great to give you that little extra comfort on the hands and are nice for wiping sweat and snot, but the real value comes if you are involved in a crash. If you wreck and put your hand down to save you without gloves, you are in for a few weeks of major discomfort. Wearing gloves will save those hands from the road rash – so we really encourage you to wear them.
- Bottoms – Mandatory (I may have chuckled writing mandatory on that) – Bibs are the way to go. If you haven’t tried them, you may want to. That said, any bottom with a padded chamois should be good to go. There are a lot of options based on weather conditions, but you can scope in the layering guide.
- Socks – Optional – If you’re wanting to look like a “roadie” then you’ll definitely want the socks. In fact, higher socks are “in” right now – anything in the 4-7 inch range. That said, you are free to wear any length sock you want, or rock no socks at all. No socks will definitely get you labeled as a triathlete and racers may expect you to sit on the front and take long pulls in true triathlete fashion.
- Shoes – Mandatory – Plenty of options here. Recommended would be a clipless system to lock you into your bike. Make sure you practice clipping in and out if you are new to them.
- Shoe Covers – Optional – You’ll see some people that are wearing shoe covers (booties) if conditions are cold. Others will wear them for an increase in aerodynamics (although data is split on the amount, if any, of benefit they provide).
Bike and gear:
- Bike – Mandatory (I know, obvious) – There are a huge variety of bikes that could be used. We recommend a road specific bike with gearing that is appropriate for the course. You may NOT use a bike with aerobars, clip-on bars, or any sort of extension that “extends forwards or upwards” and provides support for the hands. In other words, you can race a mountain bike in a road or crit race, but you cannot use a bike with triathlon/time trial extended aerobars.
- Gearing – Optional – Unless you are a Junior, it’s up to you what sort of gearing you want to use for your race. Take a look at the course profile to help determine what sort of gearing you should have.
- Working brakes “on each wheel” – Mandatory – Unless stated otherwise in the rules for the specific race (say a fixed gear criterium), you must have a bike with a working brake on each wheel.
- Wheels – Mandatory – You can choose the wheel setup you would like. That’s right, even a disc wheel (I’ve seen it before and I made sure to stay far away from that person). That said, most people will be riding wheels that are 80mm’s or less. If it is a really windy day, deeper dish wheels can blow you around a bit, so may be best to go with something a little more shallow. Safety is a big priority.
- Water Bottles – Optional – This will depend on the length of your race. Having more fluids than you need is a lot better than not having those fluids when you need them. Anything over 60 minutes and you should have at least one bottle.
- Flat Kits – Optional – Almost every road race will have a follow car that will allow you to put a spare wheel set in. If you flat, you can then quickly swap out your wheel and try to chase back on. In a crit, there will be a wheel pit that you can swap out your wheel in and get a free lap while you change it. You are then placed back into the race at the back of the group you were with. You will want a flat kit if you end up getting dropped and passed by the wheel car (which stays with the front pack). Or, if you do not have a spare wheel set.
- Spare Tubes – Optional – Race long enough, and you’ll have the experience of showing up to a race with a flat tire…the same tire that you properly inflated just the night before. Make sure you have at least 1 spare tube on hand just in case you have to do a last second change.
- Nutrition – Optional – It all depends on how long the race is. General rule is over 60 minutes and you need to be eating something. (Get more details from the Event Fueling topics on this site). That said, NEVER try something new in a race that you haven’t tried first on a hard training ride.
- Bar Plugs – Mandatory – Those are those plugs that go on the ends of your handlebars. These are mandatory and can result in DQ from the event if one or both are missing.
- Bike Computer – Optional – It is handy to know how long and how far you have been riding in order to get a good feel for how much time/distance remains in the race. As you get closer to the end, positioning becomes even more important. Or if you know there’s a bit climb that starts at mile 20, having a bike computer will let you know when that is coming so you can prepare for it. Seeing the race time is helpful from a fueling standpoint in order to make sure you are consuming enough at the right times.
Final note: MAKE SURE YOU BIKE IS IN GOOD MECHANICAL CONDITION – the last thing you want is a bike that won’t shift or brakes that are rubbing to cause you to get dropped or lose places. Or even worse, have a mechanical that results in a wreck. Get it functioning properly before the race – you’ll be happy you did.
Next
Equipment Options for Time Trials
Equipment Options for Time Trials
Equipment (from head to toe):
- Helmet – Mandatory – You must have a US DOT and/or CPSC approved helmet (there should be a sticker inside the helmet). As a heads up, when you are at the race venue, you MUST have a helmet on anytime you are on your bike. So even if you are cruising your bike to the port-o-john, you must have it on. Failing to do so will likely get you yelled at by an official and they also have the option to disqualify you. Here’s a link to the USA Cycling Rule Book regarding helmets.
- Sunglasses – Optional – We recommend wearing some sort of eye protection. Some Time Trial specific helmets have a shield that is more aerodynamic and also provides great eye coverage.
- Jersey (or top) – Sleeves are NOT mandatory in a time trial. Wear what you please here. If you are looking for time savings, we recommend you go with a cycling specific skinsuit.
- Gloves – Optional – In general, we do not wear gloves for non-technical TT’s. If it’s a really hot day, or there’s going to be a lot of time jumping in and out of the aero bars, then the little extra grip the gloves provide is worth it.
- Bottoms – Mandatory – These can be any “bottom” you would like. Again, if you are using a skinsuit, then the top and the bottom are all in one.
- Socks – Optional – Just like in mass start races, totally up to you here.
- Shoes – Mandatory – Plenty of options here. Recommended would be a clipless system to lock you into your bike. Make sure you practice clipping in and out if you are new to them.
- Shoe Covers – Optional – For riders looking to make every second count, shoe covers will be used.
Bike and gear:
- Bike – Mandatory (I know, obvious) – Aerobars ARE permitted, so bring out your time trial rig and get ready to throw down. Or you can use a road bike. Or a mountain bike. Or a cyclocross bike. Up to you on this.
- Gearing – Optional – Unless you are a Junior, it’s up to you what sort of gearing you want to use for your race. Take a look at the course profile to help determine what sort of gearing you should have.
- Wheels – Mandatory – Big question is what type? You can roll any wheel setup you would like. In a time trial, aerodynamics is key, so the more aero the better, even if it comes at a weight cost. Uphill TT would be an exception here.
- Water Bottles – Optional – When seconds count for a SHORT time trial, we will remove our bottle cages. That said, some bikes have been specially designed to be more aerodynamic WITH their bottles and aero “containers” in place.
- Flat Kits – Optional – Not recommended here if you have a chance for the overall, unless it’s a really long TT and you are worried about having to get back to the start after a flat. If you have to stop and change a flat, your chances of winning are over.
- Spare Tubes – Optional – Race long enough, and you’ll have the experience of showing up to a race with a flat tire…the same tire that you properly inflated just the night before. Make sure you have at least 1 spare tube on hand just in case you have to do a last second change.
- Nutrition – Optional – It all depends on how long the race is. General rule is over 60 minutes and you need to be eating something. (Get more details from the Event Fueling topics on this site). That said, NEVER try something new in a race that you haven’t tried first on a hard training ride.
- Bar Plugs – Mandatory – Those are those plugs that go on the ends of your handlebars. These are mandatory and can result in DQ from the event if one or both are missing.
- Bike Computer – Optional – It is handy to know how long and how far you have been riding in order to get a good feel for how much time/distance remains in the race. As you get closer to the end, positioning becomes even more important. Or if you know there’s a bit climb that starts at mile 20, having a bike computer will let you know when that is coming so you can prepare for it. Seeing the race time is helpful from a fueling standpoint in order to make sure you are consuming enough at the right times.
- Bike trainer for warm-up – Optional – Having a bike trainer you can set up at or near the start line is ideal. It allows you to control your effort on your warm up, prevents you from getting lost or losing track of time, and if close enough to the start, you can hear them calling out race numbers. If you are warming up on the road, make sure you continue to circle back to the start line to make sure you do not miss your start time!
Final note: MAKE SURE YOU BIKE IS IN GOOD MECHANICAL CONDITION – the last thing you want is a bike that won’t shift or brakes that are rubbing to cause you to get dropped or lose places. Or even worse, have a mechanical that results in a wreck. Get it functioning properly before the race – you’ll be happy you did.
Next
Workout for the Day: Rest Day!
Workout for the Day: Rest Day!
No workout today. This is all about rest and recovery. Make sure you are hydrating and eating well. Less activity today means you won’t need quite as many calories as a big training day, so just be aware of how much you’re consuming.
Next
Day 5 – Technique Day
Day 5 – Technique Day
Mastering Your Pedal Stroke
Mastering Your Pedal Stroke
Follow along with Coach Bryant as he takes you through all the basics of Mastering Your Pedal Stroke. All you need is an internet connection and a device to play it.
(Note: this is video #1 of “The Perfect Pedal Stroke” Execution Plan. If you’re wanting to take your technique to another level, make sure you check it out.)
Next
Day 6 – Strength, Stretching, and Pre-Ride Fueling
Day 6 – Strength, Stretching, and Pre-Ride Fueling
Strength
Strength
Watch each exercise explanation and then perform the prescribed reps and sets with 30-60 seconds between sets. 3 SETS – 10 REPS CLOCKWISE/COUNTERCLOCKWISE 3 SETS – 8-10 ON EACH SIDE 3 SETS – 10-12 ON EACH SIDE 3 SETS – 12 REPS 3 SETS – 10-20 REPS 3 SETS – 15-25 REPS 3 SETS – 12 REPS DOUBLE LEG – 8-10 EACH SIDE SINGLE LEG 3 SETS – 30-45 SECONDS EACH SIDE
Next
Stretch
Stretch
This is more comprehensive routine to hit all the important areas to stay mobile and flexible. Just press play and follow along!
Next
Basic Fueling for Long Rides/Races to Apply Tomorrow
Basic Fueling for Long Rides/Races to Apply Tomorrow
Next
Pre-Ride Nutrition Timing Guidelines
Pre-Ride Nutrition Timing Guidelines
Next
Day 7 – Endurance Build with Breakaway Simulation Workout
Day 7 – Endurance Build with Breakaway Simulation Workout
2:30 – Race Specific Prep – Longer Ride
2:30 – Race Specific Prep – Longer Ride
Workout Duration: 2:30 hours
Workout Description:
- 15 min – Warm-up at an endurance effort and include 2×1 min “fast spins” in L4.
- 45 min – Settle into upper L2 and every 15 minutes hit a harder 3-4 min L4 effort.
- 60 min – Find a good rhythm, mid L2 to lower L3, just where it feels good. Every 5 minutes, hit a short 5-10 sec max effort sprint, then settle right back into rhythm.
- 15 minutes – At 2:00 hour mark, want a (relatively) short race simulation. Hard 2 min “attack” to get an imaginary gap, then settle into a hard effort for next 10 min. Pace this like you are solo off the front. Last 3 min full gas, and end with a sprint. Legs will likely be smoked and you won’t want to do the sprint, but do it.
- 15 minutes – Easy L1 cool down final 15 min.
Workout Focus:
- Prep the body for the varied intensity that will come in a race.
- Work all energy systems.
- Hit a long enough duration to properly prep the body for almost all Category 5 races.
Next
Day 8 – Sprint Technique and Sprint Session 1
Day 8 – Sprint Technique and Sprint Session 1
Sprint Technique Overview
Sprint Technique Overview
Sprinting is a combination of timing, technique, and shear force production.
Some of the keys for sprinting:
- Make sure you come off the saddle, shifting your body forward and rolling your pelvis.
- Hands should be down in the drops for a more aerodynamic position. Play around with keeping a lower vs higher upper body position and see what works and feels best for you.
- As you drive down with your right leg, you should be pulling up with your right hand. Tip: play around with your direction of pull. Some feel the best power when pulling directly up, and others pulling up and across.
- Your bike should rock left to right. If you keep your bike straight up and down, you are missing out on extra power.
- Play around with your direction of force production. Try pushing down and back and see how that feels. Then try pushing straight down towards the ground. Work different angles and feel what works best for you.
- Be quick through the bottom of the pedal stroke. As you feel the foot “bottom out,” quickly drive that foot through the upstroke. Again, play with timing and direction of drive here.
- Learn the gear and cadence that works best for you. Too hard of a gear and you will struggle to get a good acceleration. Too light of a gear and you will be spun out way too soon.
- Work to maximize your “cadence threshold.” The higher the cadence you can continue to generate peak power, the better sprinter you will become.
Start today working on a few of these aspects, not going max effort from the start. Work timing and efficiency, then start increasing your effort levels. Practice makes perfect!
Next
1:00 – Higher Intensity Sprint Work
1:00 – Higher Intensity Sprint Work
A lot of events will have two days of racing. Today, we are hitting a higher intensity sprint day to teach the body to hit back to back hard days. Start conservative on your sprints and build based on how you are feeling.
Workout Duration: 60 minutes
Workout Description:
- 15 min warm up: Include 3×1 min fast spins in L4 with 1 min recovery starting at the 6 minute mark.
- 15 min sprint intervals: 50 seconds of L2 spinning followed by 10 seconds of repeatable sprint efforts. Target 80% or so of max based on perceived effort. Vary your cadence on each sprint, really getting a feel for what allows the best jump.
- 5 min: Nice and easy! Full recovery and prep for next round of intervals.
- 15 min sprint intervals: Same as before, but legs are likely going to be a bit tired now. Looking for repeatable efforts on the first 10, then really starting to lay it out there for the last 5.
- 10 min cool down: Nice and easy, basking in the glory of your newfound sprint prowess.
Next
Day 9 – Recovery Day
Day 9 – Recovery Day
0:20 – Stretch, foam roll, and/or massage.
0:20 – Stretch, foam roll, and/or massage.
Goal for today is to maximize recovery. You had 2 HARD days back to back which means recovery is your primary focus. Seriously, do not do much of anything today.
Hit 20 minutes of foam rolling, and/or light stretching, and/or massage stick. All of these are great on a recovery day. Key with the stretching is to make sure the muscles are warmed up in advance, so a light little spin of 15 minutes is fine, but keep it L1.
Place foam rolling video
This is more comprehensive routine to hit all the important areas to stay mobile and flexible. Just press play and follow along! Or at minimum, hit our quick post activity routine.
Next
Nutrition Webinar with Coach Casey Katz
Nutrition Webinar with Coach Casey Katz
Next
Day 10 – Hill Climb Workout and Technique Discussion
Day 10 – Hill Climb Workout and Technique Discussion
Hill Climb Technique Overview
Hill Climb Technique Overview
A couple days ago you worked on Sprint Technique. Out of the saddle climbing is not all that much different from a technique standpoint.
The major difference is your hand position moves from the drops to the hoods. This allows for a more upright body position, more open hip angles, and better breathing for the much longer duration that is required on climbs vs sprints.
Standing while climbing is a great way to recruit different muscle groups and can also help you get that little bit of extra power on the steeper sections of the climbs.
For most riders, the bulk of climbing is going to be done while seated. Here’s are some climbing pointers to work on:
- Make sure you are either on your hoods, or even sitting up further and resting your hands on your bar tops right near your stem.
- Slide back in the saddle. This allows for a more open hip angle, better glute recruitment, and better breathing.
- Play around with your direction of force throughout the pedal stroke. Most find that pushing slightly down and forward on the downstroke is most effective. Be sure to actively recruit your hamstrings through the bottom, and provide a short quick drive of your knee on the upstroke. This will help ease the load of your quads.
- Relax your toes and drop your heel. Try and keep that footbed parallel to the ground on the downstroke and make sure you aren’t letting that heel drift up on the upstroke.
- Play around with cadence and see how it impacts your perceived effort and/or power and/or heart rate.
- Keep your core and hips relaxed but ENGAGED. You don’t want to be bouncing all around and wasting energy with your upper body.
- On steeper sections, assuming you aren’t standing, pull back slighly harder on your bars to provide a little more leverage and power transfer.
- Find a breathing rhythm. Climbing is all about finding that steady effort that you can sustain without blowing up.
- Look to drop some weight – the steeper it gets, the more the weight of you and your bike is holding you back. Shed some weight from one or both and you’ll be shaving valuable seconds off your hill climbs.
Just like with sprinting, this too takes practice. If you do not have any climbs in your area (I feel for you, cause we lack them also), then you can do a couple things:
- Find your longest incline, start from an almost standstill rather than carrying momentum, and complete as many repeats as you can.
- Find a headwind, simulate a climbing position, and let the wind resistance help increase your effort while decreasing your speed (and momentum).
- Set your trainer up (if you have one) in a climbing position with your front wheel elevated slightly higher than your back. Find a gear that allows for a cadence similar to what you will be climbing at in your event/race, and knock out your intervals there.
Enjoy!
Next
Hill Climb Workout #1
Hill Climb Workout #1
Workout Duration: 1 hour 15 minutes – depending on fitness level and available time. Minimum of 50 minutes.
Workout Description:
– 10-15 minute warm-up: Include 3×1 min “openers” in L3/.
– Work interval: 5 min in length at L4 effort levels. Start in mid to low L4 on the first interval and work to progress from there. Cadence will be in the 70’s to 80’s.
– Recovery interval: 5 min and will be in low L2/upper L1 effort levels. Cadence will on upper end of “normal”
– Total number of intervals: Shoot for 4 to 6 intervals.
– Cool down: Easy spinning and stretch well post workout.
Next
Day 11 – Strength and Stretching
Day 11 – Strength and Stretching
Strength
Strength
Watch each exercise explanation and then perform the prescribed reps and sets with 30-60 seconds between sets.
3 SETS – 10 REPS CLOCKWISE/COUNTERCLOCKWISE
3 SETS – 8-10 ON EACH SIDE
3 SETS – 10-12 ON EACH SIDE
3 SETS – 12 REPS
3 SETS – 10-20 REPS
3 SETS – 15-25 REPS
3 SETS – 12 REPS DOUBLE LEG – 8-10 EACH SIDE SINGLE LEG
3 SETS – 30-45 SECONDS EACH SIDE
Next
Stretch
Stretch
After the strength, this is more comprehensive routine to hit all the important areas to stay mobile and flexible. Just press play and follow along! Or at minimum, hit our quick post activity routine.
Next
Basic Guidelines for Fueling during Training and Racing
Basic Guidelines for Fueling during Training and Racing
Proper fueling is HUGE when it comes to having a strong performance on the bike. The key is dialing in what YOUR body needs and what works for you. Unfortunately, there isn’t one set “recipe” for what you should be consuming. That said, let’s take a look at some generalities.
Calorie replacement during exercise:
- If you are exercising for under 60 minutes, odds are you aren’t going to need any calories during your ride.
- Efforts over 60-90 minutes, and you’ll want to start taking in nutrition.
- Most people will process around 250 calories per hour. Some of you will be able to handle quite a bit more, while others will be on the lower side. Use this as a starting point and adjust based on your needs.
- At a high effort, you are likely burning through around 400-600+ calories per hour in carbohydrates.
- At high intensities, there is a good chance you are burning through more calories (fuel) than your body can replace and process. This is where that “bonk” can happen. Make sure you are eating early and often.
- People will handle sugar concentration levels differently. Too much sugar tends to lead to stomach issues in most athletes. If you’re getting an upset stomach, scale back your sugars.
Electrolyte replacement:
- American College of Sports Medicine recommends replenishing electrolytes for activity lasting longer than 1 hour.
- Sodium is the most important electrolyte to replace, along with potassium and magnesium in smaller amounts.
- Experiments have shown sodium loss is highly individual – 480 to 1840 mg/L of sweat. That’s a huge range and why not everyone needs the same amount of sodium replacement.
- Initially, start around 400-500 mg of sodium per hour if you are in a high heat index area of the world.
- Most sports drinks will have good baseline levels for electrolytes, but you may find you need more if you are exercising in a high heat index environment.
Fluid Replacement:
- You should have already calculated your sweat rate, so you should be good to go in this category.
Next
Day 12 – Sprint Day #2
Day 12 – Sprint Day #2
1:00 – Sprint intervals! Woohoo!
1:00 – Sprint intervals! Woohoo!
Pushing out one extra set of intervals, but dropping the number of sprints in each set. Want you ramping it up a bit over last time.
Workout Description:
- 15 min warm up: Include 3×1 min fast spins in L4 with 1 min recovery starting at the 6 minute mark.
- 10 min sprint intervals: 50 seconds of L2 spinning followed by 10 seconds of repeatable sprint efforts. Target 80% or so of max based on perceived effort. Vary your cadence on each sprint, really getting a feel for what allows the best jump.
- 5 min: Nice and easy! Full recovery and prep for next round of intervals.
- 10 min sprint intervals: Same as before, but legs are likely going to be a bit tired now. Looking for repeatable efforts on the first 7, then really starting to lay it out there for the last 3.
- 5 min: Nice and easy! Full recovery and prep for next round of intervals.
- 10 min sprint intervals: Legs are good and tired, just like they will be late in a crit. Now is where the fitness builds! Looking for repeatable efforts on the first 5, then everything you have on the last 5.
- 10 min cool down: Nice and easy, admiring the massive display of sprint speed you just knocked out.
Next
Day 13 – Strength and Stretching
Day 13 – Strength and Stretching
Strength
Strength
Watch each exercise explanation and then perform the prescribed reps and sets with 30-60 seconds between sets.
3 SETS – 10 REPS CLOCKWISE/COUNTERCLOCKWISE
3 SETS – 8-10 ON EACH SIDE
3 SETS – 10-12 ON EACH SIDE
3 SETS – 12 REPS
3 SETS – 10-20 REPS
3 SETS – 15-25 REPS
3 SETS – 12 REPS DOUBLE LEG – 8-10 EACH SIDE SINGLE LEG
3 SETS – 30-45 SECONDS EACH SIDE
Next
Stretch
Stretch
After the strength, this is more comprehensive routine to hit all the important areas to stay mobile and flexible. Just press play and follow along! Or at minimum, hit our quick post activity routine.
Next
Day 14 – Endurance Build with Late Breakaway Simulation
Day 14 – Endurance Build with Late Breakaway Simulation
Longer workout +30 over previous (optional group ride)
Longer workout +30 over previous (optional group ride)
If there is a group ride that will push you, hit that up. You need to be fine-tuning your pack riding skills and become really efficient at finding and riding in the draft. This is HUGE when it comes to racing.
If you are solo, hit this workout.
Workout Duration: 3:00 hours (If you struggled on the 2:30 workout like this, then keep this at 2:30 today).
Workout Description:
- 15 min – Warm-up at an endurance effort and include 2×1 min “fast spins” in L4.
- 45 min – Settle into upper L2 and every 15 minutes hit a harder 3-4 min L4 effort.
- 90 min – Find a good rhythm, mid L2 to lower L3, just where it feels good. Every 7-10 minutes, hit a short 5-10 sec max effort sprint, then settle right back into rhythm.
- 15 minutes – At 2:30 hour mark, want a (relatively) short race simulation. Hard 2 min “attack” to get an imaginary gap, then settle into a hard effort for next 10 min. Pace this like you are solo off the front. Last 3 min full gas, and end with a sprint. Legs will likely be smoked and you won’t want to do the sprint, but do it.
- 15 minutes – Easy L1 cool down final 15 min.
Workout Focus:
- Prep the body for the varied intensity that will come in a race.
- Work all energy systems.
- Hit a long enough duration to properly prep the body for almost all Category 5 races.
Next
Day 15 – Technique Day – Cornering and Shifting
Day 15 – Technique Day – Cornering and Shifting
Cornering Basics
Cornering Basics
The ability to corner efficiently is a serious skill that can mean the difference in taking the win, avoiding a wreck, or simply overworking yourself into a glorious fireworks display. The main reason for superior cornering ability is always safety, but efficiency is a close second.
Let’s say you are doing a 4 corner crit, or a nice long hard group ride with a ton of turns. If you are inefficient through every turn, you will get gapped by the person in front of you. That forces you and the people behind you to have to work harder, even for just a few seconds. But multiply that spike by the number of turns and BOOM GOES THE DYNAMITE!
With that, here are the major cornering basics, in order, to help you rail those turns with superior confidence:
- You are best suited to corner in the drops since you have a lower center of gravity. The more upright you get, the less predictable your bike will handle.
- Make sure you move to the far outside of the turn. So if you are turning right, move far left. Obviously this will be determined by the road you are on and the group you are riding in. Make sure your movement to the outside is smooth and predictable by the other riders so they can give way if need be.
- Scrub any speed you need to by feathering (grabbing lightly) the brakes BEFORE you get into the arc of your turn. DO NOT brake while in the arc of the turn.
- Shift into an easier gear so that you don’t have to grind a big gear when you get out of the turn. This is a huge mistake people make all the time.
- Make sure your inside foot is up around the 12 o’clock position.
- Your outside leg will be straight and you will have the majority of your weight on the outside foot.
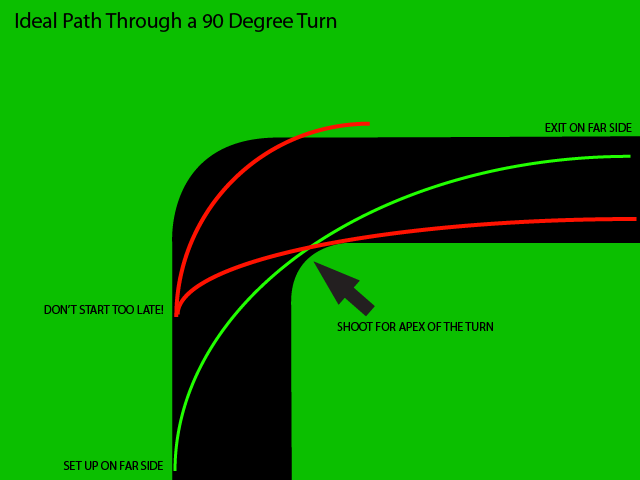
- Start your turn early and aim for the apex of the turn. This is generally the inside corner of any 90 degree turn.
- To start your turn, lean the bike (not necessarily your body) by putting pressure down on the inside hand. You can also add inside pressure by turning your knee out and pointing it towards the ground.
- The faster you are going, the more you may need to scoot back on the saddle and sink your chest lower.
- Make sure you physically look where you want to go. Initially at the apex of the turn, and then to your exit point. If you look at the curb, you will go toward the curb!
- Do NOT start pedaling until your bike starts to get vertical again.
- Exit the turn once again on the far side of the road.
Next
Race Footage Examples
Race Footage Examples
Next
Basic Shifting Guidelines
Basic Shifting Guidelines
Shifting is an important skill because proper shifting can limit the number of spikes in power that you produce over a particular ride. More spikes generally means earlier onset of fatigue. So here are our basic guidelines for proper and efficient shifting:
- Shift EARLY – Don’t wait until you are on a climb or coming out of a turn before shifting to an easier gear. The same goes for cresting a hill or going downhill in general. Don’t wait to shift to a harder gear to keep steady pressure on the pedals. Look ahead and shift based on the terrain just up the road, not what you are presently on.
- Shift OFTEN – You want to shift as often as necessary to stay within 10 rpms above or below your sweet spot cadence. Too high and your cardiovascular system burns a match. Too low and your muscles burn one.
- Don’t be afraid to use the small chain ring. It’s there for a reason. But when doing so, we generally tell people to shift 2 harder gears on the rear cassette before dropping to the smaller chainring to try to mimic the present gear ratio. Right-Right-Left!
Next
Cornering Technique Session
Cornering Technique Session
Total Time: 1 hr
This session should be an overall easy effort. You are to work on the pointers and techniques from above for about an hour with some spinning before and after. We highly recommend you find a safe area and practice with cones or other markers before practicing on the roads. You can easily set up a small course in a parking lot or neighborhood cove (some call them cup-de-sacs). Start at a moderate speed and then amp it up as you feel comfortable. We recommend starting with doing larger radius 180 turns and then making them tighter and tighter as you feel comfortable. Make sure you work on right and left hand turns! We need to be ambi-turners.
Next
Day 16 – Recovery Day
Day 16 – Recovery Day
No bike work – Stretch and/or rolling
No bike work – Stretch and/or rolling
All about maximizing recovery today. Rest up and enjoy the mental and physical break from training.
Hit 20 minutes of foam rolling, and/or light stretching, and/or massage stick. All of these are great on a recovery day. Key with the stretching is to make sure the muscles are warmed up in advance, so a light little spin of 15 minutes is fine, but keep it L1.
Just press play and follow along! Or at minimum, hit our quick post activity routine.
Next
Day 17 – Hill Climb or Group Ride with Pack Skills
Day 17 – Hill Climb or Group Ride with Pack Skills
1:15 – Hill Climb #2 (Option 1)
1:15 – Hill Climb #2 (Option 1)
Workout Duration: 1 hour 15 minutes – depending on fitness level and available time.
Workout Description:
– 10-15 minute warm-up: Include 3×1 min “openers” in L3/4.
– Work interval: 7 min in length at L4 effort levels. Start in mid to low L4 on the first interval and work to progress from there. Cadence will be in the 70’s to 80’s.
– Recovery interval: 3 min and will be in low L2/upper L1 effort levels. Cadence will on upper end of “normal”
– Total number of intervals: Shoot for 4 to 6 intervals.
– Cool down: Easy spinning and stretch well post workout.
Workout Notes:
- We are increasing the work interval by 2 minutes and decreasing the recovery by 2. This will be a tougher day than before, but try and match previous numbers if using HR or Power.
- Select this workout if you’ll be doing a hilly course.
- You do not need to have a climb nearby to work on this. If you have a trainer, this can be done really easily indoors. If outdoors, try and find a steady grade, even if it’s flat. We want good, consistent effort.
Next
1:15 to 1:30 – Group Ride Working Pack Skills (Option 2)
1:15 to 1:30 – Group Ride Working Pack Skills (Option 2)
If you feel your bigger weakness is the varied efforts of a group ride, hit that up today. Goal is to maximize your comfort in the pack and let the natural changes in speed give you a good workout.
Make sure you are finding a group ride that will challenge you today. You need to be forced to dig a little deeper than you would solo.
Goal duration is 1:15 to 1:30 of total time. Work a 10 to 15 min cool down into the ride if possible.
Pack Skills to Work On:
- Holding your line – no deviating from it unless absolutely necessary.
- Not opening gaps – Stay close to the wheel in front of you. No more than 3 feet of distance from your front tire to their back tire. It is okay to stagger slightly (6-12 inches) to one side or the other if you are nervous about the rider hitting their brakes and running into them.
- Riding close to the person next to you – Increase you comfort riding close to other riders. In a race, there will be times that you’ll have people to your right and left that are just inches away. Stay relaxed, keep your elbows out slightly, and stay smooth.
- Eating and drinking – Ideally this is done when you are at the back of the pack, but it is also necessary to do in a race when you are in the group. If you are uncomfortable, stay at the back to practice. As confidence and bike handling ability improves, try it within the group.
Next
Day 18 – Strength and Stretching
Day 18 – Strength and Stretching
Strength
Strength
Watch each exercise explanation and then perform the prescribed reps and sets with 30-60 seconds between sets.
3 SETS – 10 REPS CLOCKWISE/COUNTERCLOCKWISE
3 SETS – 8-10 ON EACH SIDE
3 SETS – 10-12 ON EACH SIDE
3 SETS – 12 REPS
3 SETS – 10-20 REPS
3 SETS – 15-25 REPS
3 SETS – 12 REPS DOUBLE LEG – 8-10 EACH SIDE SINGLE LEG
3 SETS – 30-45 SECONDS EACH SIDE
Next
Stretch
Stretch
After the strength, this is more comprehensive routine to hit all the important areas to stay mobile and flexible. Just press play and follow along! Or at minimum, hit our quick post activity routine.
Next
Day 19 – Pedal Stroke Technique Day
Day 19 – Pedal Stroke Technique Day
More Pedal Stroke Reinforcement
More Pedal Stroke Reinforcement
Just press play and follow along. This session was filmed during our winter online training class, also affectionately known as the House of Pain. Today’s efforts are mostly Z2 or Z3 so most of the challenge will be muscular and neuro-muscular (that brain and body connection which leads to increased efficiency).
Next
Day 20 – Strength and Stretching
Day 20 – Strength and Stretching
Strength
Strength
Watch each exercise explanation and then perform the prescribed reps and sets with 30-60 seconds between sets.
3 SETS – 10 REPS CLOCKWISE/COUNTERCLOCKWISE
3 SETS – 8-10 ON EACH SIDE
3 SETS – 10-12 ON EACH SIDE
3 SETS – 12 REPS
3 SETS – 10-20 REPS
3 SETS – 15-25 REPS
3 SETS – 12 REPS DOUBLE LEG – 8-10 EACH SIDE SINGLE LEG
3 SETS – 30-45 SECONDS EACH SIDE
Next
Stretch
Stretch
After the strength, this is more comprehensive routine to hit all the important areas to stay mobile and flexible. Just press play and follow along! Or at minimum, hit our quick post activity routine.
Next
Day 21 – Group Ride/Race Simulation with Fueling Test
Day 21 – Group Ride/Race Simulation with Fueling Test
2-3h Group Ride
2-3h Group Ride
Try and find a group hard group ride today. Unsure of how to do that?
- Ask the local bike store if they know of a good one for you.
- Follow this link – http://usacycling.org/clubs/ – and select your state to filter down to your area.
Workout duration: 2 to 3 hours. Ideally at least as long as your upcoming race distance.
Workout description: Today is the day to test your body all why dialing in your comfort and efficiency in a group. The natural varied intensity of this ride will be great a great simulation for the upcoming race. Dig deep today, even if you are suffering. Always tell yourself when you’re suffering that others are suffering just as much as you and then hold on for that 30 seconds longer. Make sure you pay attention to the mental checklist anytime things get tough. It will help get you through!
Things to note:
- Don’t go brain dead today because you are with a group. Make sure you eat and drink regularly. A good tip is to eat/drink anytime you see someone else eating/drinking.
- Don’t go out like a superhero. Build into this ride! Spend the first have getting a feel for the intensity and your ability, and if you feel good later, be more active on the front.
- Go with the flow of the group. Ask if attacks are allowed, if there are sprint sections, etc. Some groups this is groovy, others is all about organized paceline’s and specific speeds.
- Maximize your efficiency in the pack. Try and find the biggest people to draft behind. Pay attention to wind direction and position yourself accordingly. All this adds up to energy savings that you’ll need later in the ride and is great practice for race day.
- Enjoy yourself!
Next
Dial in Nutrition for Race Day
Dial in Nutrition for Race Day
Big point of emphasis today is to dial in your race nutrition. Make sure you are eating and drinking THE SAME stuff you will be using in the race.
If you get halfway through this hard ride and feel like you’re going to puke….you’ll need to change you fueling plan.
If you get 2 hours into this ride and go bonk mode…you’ll need to change your fueling plan.
If every time the effort and intensity spikes you’re burping up stuff you shouldn’t be…you guessed it, time to tweak the fueling plan.
Two ways to do this:
- Take a look at the total amount of calories you are consuming to see if maybe it’s too much (burping up stomach contents) or too little (bonk mode).
- Take a look at the ingredients. Too much protein at high intensity can cause poor digestion and ultimately stomach issues. Same with too much sugar and too much fat.
If you have issues today, retest on Day 24 – Sprint Work #3.
Next
Day 22 – Technique Day – Cornering and Shifting
Day 22 – Technique Day – Cornering and Shifting
Workout for the Day – Cornering with Jumps
Workout for the Day – Cornering with Jumps
Workout Duration: 45 to 60 minutes
Workout Description: Work on cornering at different speeds and pre-shifting to the appropriate gear to accelerate out of the corners. Hit a very short “jump” to get back up to speed and then recover. The primary focus today is on gear selection and really feeling out the proper gear. It’s a bit of an art form, so work on it.
Do not over cook yourself today. Jumps out of the corner should be at about 80%. Play around with what cadence gets you back up to speed the best.
Next
Day 23 – Rest and Recovery – Should you carbo load?
Day 23 – Rest and Recovery – Should you carbo load?
No workouts
No workouts
All about the rest and recovery today. You should know what to do by now on these days. While you’re resting up, make sure you watch the quick video on “carbo loading.”
Next
Should you carb load?
Should you carb load?
It’s race week and many folks will begin thinking about “carbo loading” to get that extra performance gain.
Here’s our recommendation:
Don’t do it!
We go into more about why in this quick video:
Next
Day 24 – Sprint Work #3
Day 24 – Sprint Work #3
Workout for the Day – Working on Jumps and Attacks
Workout for the Day – Working on Jumps and Attacks
Workout Duration: 1:15
Workout Description:
- 15 min warm up: Include 3×1 min fast spins in L4 with 1 min recovery starting at the 6 minute mark.
- 10 min sprint intervals: 50 seconds of L2 spinning followed by 10 seconds of repeatable sprint efforts. Target 80% or so of max based on perceived effort. Vary your cadence on each sprint, really getting a feel for what allows the best jump.
- 10 min: Nice and easy! Full recovery and prep for next round of intervals.
- 10 min sprint intervals: Same as before, but legs are likely going to be a bit tired now. Looking for repeatable efforts on the first 7, then really starting to lay it out there for the last 3.
- 10 min: Nice and easy! Full recovery and prep for next round of intervals.
- 10 min sprint intervals: Legs are good and tired, just like they will be late in a crit. Now is where the fitness builds! Looking for repeatable efforts on the first 5, then everything you have on the last 5.
- 10 min cool down: Nice and easy, thinking about how awesome you’re going to do in the race this weekend.
Notes:
- This is the same as Sprint Work #2, but we’ve increased your recovery time between sets.
- If you are pressed for time, keep the recovery the same but cut the middle set of intervals.
Next
Day 25 – Strength and Stretch – Best Race Ever Guide
Day 25 – Strength and Stretch – Best Race Ever Guide
Lighter Strength
Lighter Strength
Watch each exercise explanation and then perform the prescribed reps and sets with 30-60 seconds between sets. We suggest lightening any weights you have been using, or just use bodyweight this week. We don’t want to be sore for our first race!
2 SETS – 10 REPS CLOCKWISE/COUNTERCLOCKWISE
2 SETS – 8-10 ON EACH SIDE
2 SETS – 10-12 ON EACH SIDE
2 SETS – 12 REPS
2 SETS – 10-20 REPS
2 SETS – 15-25 REPS
2 SETS – 12 REPS DOUBLE LEG – 8-10 EACH SIDE SINGLE LEG
2 SETS – 30-45 SECONDS EACH SIDE
Next
Stretch
Stretch
After the strength, this is more comprehensive routine to hit all the important areas to stay mobile and flexible. Just press play and follow along! Or at minimum, hit our quick post activity routine.
Next
Best Race Ever Guide
Best Race Ever Guide
Grab a snack and a drink, and settle down for a little performance maximizing read.
There are 5 main areas that you need to maximize in order to have your best race possible. In this guide, we’re going to run right through all of them.
Step One: Proper Race Selection
In order to maximize your overall result, choosing a race that suits your strengths and hides your weaknesses is of utmost importance. This is where you need to think about what type of racer you are. (For your first time racing, it may take a few different races to figure out where you are strongest/weakest, so don’t stress too much about this.)
- Do you do best on long, steady, gradual hills?
- What about short or long hills that have steeper climbs?
- Do you struggle going up hills but do just fine on the flats?
- What about rolling hills?
- Can you recover quickly and put out short bursts of energy?
If you found that you are more explosive and can put out a lot of short, repeated, hard efforts, then a criterium would likely suit you best. Or possibly a road race that has shorter, punchier hills. Are you 140 pounds dripping wet and love every hill you see? I think you get the idea, a road race with a lot of climbing is likely going to be best. Remember, the goal is to train your weaknesses but race your strengths!
Step Two: Course Preview
With the race selected, it is now time to find out as much about the course as possible. Assuming you live near the race, try and include the race course into regular training. If it is a shorter course, hit it a few times a week. Break a longer course into segments and try to include a section or two per week into your program. Knowing the course and the effort that can be sustained at different parts of the course can be a huge advantage. Racers will often improve race times from one race to another over the same course just due to knowledge of the course alone.
A course may look perfectly flat when looking at a race profile online, but actually being on the course may tell a totally different story. Effort regulation for a 6 mile flat race loop is going to be a lot different than a 6 mile race that is 5 miles flat and 1 mile uphill. Total distance is the same, but the difficulty and time to complete the race is going to increase on the course with the climb. Knowing there is a climb at the end will play into your strategy and tactics during the race.
For racers that are only able to preview the course the day of or the day before, do your best to preview the “key” features of the course prior to the race. Some things that you should be looking for:
- Is the course going to be shaded or will it be exposed to the sun – this could make a big difference in equipment, clothing, and nutrition selection.
- Are there certain areas of the course where wind may be a factor – this will be important from a positioning (if it’s not a time trial) and effort regulation standpoint.
- How long and hard are the hills/climbs of the course – this will again impact effort regulation and race strategy.
- Are certain sections more technical than others? You will want to try and be very near but not on the front before you get to these key sections.
If the course is not marked with distance markers, make note of any features that will provide a reference of distance/time remaining. In order to really pace your effort accordingly, knowing the amount of time you have left is extremely important.
Step Three: Equipment Selection
Take a look at the course, the distance, and the temperatures when selecting your equipment. The hotter it is, the less clothing you will want. That super aero helmet that doesn’t allow a hint of wind through it? Maybe swap that for something that is going to breathe a little better.
Here are some general rules:
- The greater the wind resistance on the body and equipment, the more important aerodynamic equipment selections will become.
- The greater the resistance from gravity against forward motion, the more important decreasing the weight of equipment will become.
Without getting too involved with the science behind it, it is okay to sacrifice weight if the course is going to cause a high amount of wind that is resisting forward movement (either from your body traveling fast or the wind blowing really hard). Tight fitting clothing is always going to be preferred over the baggy, loose fitting options. The purchasing of “aero” equipment (which can be very pricey) is one way to improve your speed without having to improve your strength and fitness. Aerodynamics should be looked at when the “wind speed” is 15 mph or more. If you get above 22 mph combined then aerodynamics should play a very important role.
Example on “aerodynamic drag.” If you are riding at 20 mph into a 20 mph head wind, effective wind speed is calculated by adding 20 mph to 20 mph, which results in 40 mph wind speed. Aero equipment is HUGE in this situation. Now if you turn around and are traveling at 20 mph with a 20 mph tailwind, aerodynamics are far less important.
When the biggest challenge on the course is not wind speed, but instead gravity, total weight becomes a big factor. The more weight you have to cart up a hill, the more energy it’s going to take to travel a given speed. Losing a few pounds, either off the body and/or equipment, will help save precious seconds.
It is far cheaper to shed pounds off your body than it is to shed pounds off your equipment, so make sure you pay attention to your nutrition. That said, big money is spent each year on shaving weight off your equipment. Just make sure it is able to handle your weight.
Naturally, the “best of both worlds” would be having equipment that is light AND aerodynamic. Next time an athlete goes to purchase equipment, discuss with the sale’s person about the trade-offs between weight and aerodynamics. All equipment is NOT created equal. Sometimes stiffness is sacrificed for weight – not good for a sprinter in a bike race.
Step Four: Race Preparation
The three factors that will be discussed in this category are:
- Pre-race meal timing
- Proper pre-race warm-up
- Race fueling
Number 1: Pre-Race Meal Timing
Note: The ideal pre-race meal timing is going to vary from racer to racer. This will serve as a great starting point, but may need to be adapted based on how quickly an individual is able to break down and process a pre-race meal.
General Rule: The higher the intensity of the event, the greater the time between pre-race meal and race start time.
For a shorter race (under 1 hour) that is going to be completed at high intensity, a racer needs to allow plenty of time for the food to be broken down and turned into usable energy. Racers should allow for AT LEAST 2.5 hours between eating the meal and starting the race. Most racers have made the mistake of eating too close to the start of the race, leaving partially digested food in their stomach when toeing the start line. Not good. During high intensity efforts the body is forced to push blood to working muscles, thus shutting off the digestive system. The result? A lot of gastro-intestinal discomfort and likely a decrease in overall race performance.
For races that are going to be performed below “threshold,” eating closer to race start might not be a problem for most racers. Some will still need to abide by that minimum of 2.5 hours rule. For racers who get the “pre-race jitters,” it is recommended to stick to the 2.5 hour rule. Nerves will have a way of making the stomach unsettled. A partially digested meal and high amount of nerves can have a performance inhibiting effect as well.
The best way to figure out what works is to experiment with it during training. Prior to a race level effort training day, eat 2 hours before the training session. Note how the training session went. Write down how the stomach felt and what the energy levels were. If everything felt great, then stick with that for training day. If stomach was upset during the training session then push that pre-race meal out to 2.5 hours.
Number 2: Pre-Race Warm-Up
A warm-up is meant to prime the body for the effort that is going to be undertaken. The harder that effort is going to be, the greater the need to make sure the muscles, ligaments, and tendons are properly prepped.
General Rule to Follow: the shorter and more intense the effort, the longer and harder the warm-up should be. It is not uncommon to see endurance athletes perform an hour or more warm-up for events that are only going to last 5-10 minutes. The purpose for this warm-up is to bring fresh oxygen and blood to working muscles, begin the lactic acid buffering process (which is done by completing hard enough efforts to “get a good burn going”), and prepare the body for the hard effort that is going to be undertaken.
Number 3: Race Fueling
There have been entire books written about this category (as well as the others that have been addressed in this guide), so this is going to be kept general and highlight the most important aspects of race fueling. Race fueling, just like the pre-race meal, is going to involve personal experimentation. The following should get 95% of all racers in the ball-park of where they should be nutrition wise.
First, some basics on nutrition:
During athletic activity, the body utilizes fat and carbohydrates for fuel. The higher the intensity, the greater the body relies on carbohydrates for fuel instead of stored fats. This fuel can come in the form of stored muscle glycogen in the muscles and liver, and/or glucose in the blood stream from that sugary drink you just drank.
Although the number varies based on size and physical makeup of the individual, most athletes will have no more than around 2000 calories of stored carbohydrates (in the form of muscle/liver glycogen). So if an athlete is burning 1200 calories an hour during very intense exercise, and if 1000 of those calories come from carbohydrate stores and 200 is coming from fat stores, that athlete will run out of fuel stores after 2 hours. This is what is know as “the bonk” or “hitting the wall.” Knowing this, an athlete should be able to delay this depletion by incorporating carbohydrates into their system in the form of food or liquid. This is where all of those sports drinks, energy bars, and gels come into play. Athletes also supply their energy needs with more natural foods like potatoes and bananas. Whatever an athlete chooses, test it out in during a hard training session prior to using it in a race.
Lower intensity efforts are going to require a lower percentage of fuel coming from carbohydrates. If prepping for an ultramarathon, you’ll be best served consuming complex carbs, fats, and proteins as opposed to eating gel upon gel. As stated before, each person is going to require different fueling plans, so experiment prior to the race.
Races that are under 1 hour in duration and held under moderate race conditions will MOST LIKELY not REQUIRE the need to fuel. Some athletes can get by just fine without any food or water intake for this length of an event. Other racers may go through 1 or more water bottles full of fluid to perform at their optimal level. At most however, an athlete should consume no more than around 240-300 calories of fuel during a one hour period since most people are not capable of digesting and processing more than that amount. Again, this will vary, based on each individual, but this will provide a range to work with.
Below are some general rules of race fueling for a race held under moderate race conditions. Extreme temperature, elevation, and other course conditions may impact fueling requirements:
- Keep calorie intake per hour around 200 to 300 calories. Most athletes can only process around 250 calories per hour, so more than that may result in stomach irritability occurring.
- The more intense the effort, the greater the need for carbohydrates to be the main fuel source.
- The more hot and humid a race, the greater the need to properly hydrate throughout a race. Dehydration can greatly impact human performance.
- If a race is going to require fueling, begin fueling at the start line and continue fueling in small amounts every 20-45 minutes throughout the duration of the event. Do not wait until hunger or thirst hits to begin fueling – by then it is too late.
- Anything over 1 hour in duration and most athletes should be hydrating (a minimum of 1 x 24 oz bottle per hour). Use your sweat rate calculation to dial this in.
- Any event that is going to last more than 1:30 to 2 hours in duration should require fueling to ensure top performance. Outside factors will really impact the amount and type, since a 110 degree day is going to cause more energy consumption than a 50 degree day on the same course.
- Electrolyte replacement is going to be an important aspect to proper fueling. Just drinking water for races of extended duration or held in hot climates can have very dangerous effects on an athlete, including hyponatremia – a potentially fatal condition. Feel free to read Coach Sanford’s hyponatremic race report and learn from his mistake.
Step Five: Pacing and Effort Regulation
Pacing and effort regulation is a very important part of racing. Going out too hard and too fast will most definitely result in blowing up before the finish. Go out too slow and an athlete risks not maximizing their potential and leaving some valuable time out on the race course. Ever see the person who sprints the last 100 meters of a time trial? That sprint energy could have been better used throughout the race.
The goal when racing against the clock (time trial) is to finish the race with absolutely nothing left in the tank right when the finish line is crossed. Now it is time to look at how best to accomplish this task.
- “Trust Your Training” – Include race simulation efforts in the leadup to your goal event in order to dial in realistic race pacing. This can be done through perceived effort, heart rate, pace/power zones, or a combination of all of these.
- Break the race into ¼ segments:
- First quarter of the race: this should not only feel the easiest, but it should BE the easiest. Adrenaline is on high and the body is fresh so the tendency is to go out WAY TOO HARD. If you have ever toed the line before, you know exactly what we’re talking about. Stay conservative, relaxed, and focus on holding back the first quarter.
- Second quarter of the race: settle into that effort that you know you can sustain for the entire race. Continue to relax, focus on your body, and stay smooth!
- Third quarter of the race: mentally, this is the toughest segment. You’ve been pushing long and hard enough that it’s starting to hurt, but mentally there’s still a long ways to go. Do everything you can to maintain or increase effort during this quarter, especially if this is a shorter race. Don’t block out what the body is telling you, instead work to decrease perceived effort while increasing speed! (We discuss this a lot with our athletes – knowing the que’s your body is giving you and adjusting to maximize efficiency and performance). Test this in training.
- The fourth and final quarter: it is time to lay it all out there. Mentally, most people get a little boost because the end is near. The body gets to a point where it realizes there is only X distance or time left, and is able to dig deeper. Lay it all out there this last segment of the race.
- Pace yourself relative to the conditions of the course. Some common factors:
- Wind and heat
- Uphills
- Downhills
- Technical sections of course where speed is impacted
- You will gain the most time by pushing slightly harder in the areas of the course where the resistance is greatest (uphill, into the wind). Knowing this, on an out and back course that is a headwind in one direction and a tail wind the other direction, more effort should be expended into the wind than traveling with the wind. Same with uphills – push slightly harder on the hills and “recover” slightly on the downhills once you are back up to speed. This DOES NOT MEAN to go all out one half of the course and expect to be carried effortlessly the other direction. Use downhill, down wind, and down current sections to keep pace high and “recover” just under race effort (not pace).
- Stay relaxed and let your body work. Keeping a tight upper body during a race is going to waste energy. So is being tense and white knuckling your bars. Wasted energy is time wasted.
- Be efficient in technique and movement. Bouncing all around with your upper body wastes energy. Knees that rotate in and out relative the the frame during each pedal stroke is wasting power and energy. Both of these result in slower times, something every athlete is trying to avoid.
Lastly, you must compete with confidence! Going into a race defeated or with a negative outcome in mind is a sure way to not achieving your goals. At BPC we always recommend each athlete to set lofty but achievable goals and then believe that they can accomplish them. Endurance sports are often more about mental toughness than physical prowess. That is the beauty of the endurance world – it is a race against the course, the competition, and yourself. Now go out there and dominate your next race with confidence!
Next
Day 26 – Technique with Openers
Day 26 – Technique with Openers
Workout for the Day
Workout for the Day
We are getting close to race day! Getting excited!? You should be. You are ready.
Today we don’t want to load up our legs too much, but we do want them to be primed and ready for this weekend. The total ride time shouldn’t be much over 1 hour.
Warm up 15 min with 3×1 min fast spins. Focus on each phase of the pedal stroke for a few minutes each, on each side.
We are going to try to hit every zone to get the legs opened up.
10 s max effort, recover fully
1 min @ Z6, recover fully
2.5 min @Z5, recover fully
5 min @ Z4, recover fully
10 min Z3
Cool remainder and enjoy the rest of the day. Don’t forget to hydrate!
Next
Day 27 – Course Recon and Race Prep
Day 27 – Course Recon and Race Prep
Ride the course or part of course to open legs
Ride the course or part of course to open legs
Course recon is HUGE! If you can ride part of the course to open the legs up, great. If not, try and make sure you at least drive it. You have already learned about all this in the Best Race Ever Guide from 2 days ago.
Workout Duration: 45 to 60 minutes
Workout Details: Goal today is to spin the legs out and get the body opened up and ready to race tomorrow. It is NOT to smoke yourself and get a “good workout” in.
Keep intensity L1 or Low L2. Every 10 minutes, hit a 1 minute L4 fast spin to wake the legs and lungs up. Resume the easy spinning.
Stretch and/or foam roll post workout.
Next
Gear Checlist
Gear Checlist
Helmet
Helmet
Glasses
Glasses
Jersey or skinsuit
Jersey or skinsuit
Base Layer (if necessary)
Base Layer (if necessary)
Arm warmers (if necessary)
Arm warmers (if necessary)
Jacket and/or Vest (if necessary)
Jacket and/or Vest (if necessary)
Gloves
Gloves
Bibs/shorts
Bibs/shorts
Tights (if necessary)
Tights (if necessary)
Knee and/or Leg Warmers (if necessary)
Knee and/or Leg Warmers (if necessary)
2 Pairs of Socks
2 Pairs of Socks
One for during the race and the other for post race. No stinky feet during your podium presentation!
Next
Booties and/or toe covers (if necessary)
Booties and/or toe covers (if necessary)
Cycling Shoes
Cycling Shoes
Wallet with license and race registration/race license money
Wallet with license and race registration/race license money
There is now a USA Cycling app for smart devices which can be used. Make sure you still have your driver’s license so they know it’s you.
If you have to pay for a one day license, make sure you have cash just in case you cannot pay with a card.
If you registered online through USA Cycling, then payment for license and race should be covered already, and you’ll just need to provide ID of who you are when picking up your packet.
Next
Sunscreen
Sunscreen
Chamois cream
Chamois cream
Nobody likes chafing or saddle sores.
Next
Race food
Race food
Race drinks
Race drinks
Water bottles
Water bottles
Post race food and drink (if necessary)
Post race food and drink (if necessary)
If you are doing an event that has multiple events in one day, make sure you have this so you can get the recovery nutrition you need ASAP after your race.
Next
Cooler for pre/post race food and drink
Cooler for pre/post race food and drink
Spare wheels (if you have them)
Spare wheels (if you have them)
Spare tubes
Spare tubes
Bike pump
Bike pump
Bike trainer (optional)
Bike trainer (optional)
Warming up on a trainer keeps everything nice and controlled while allowing you to stay near the start line. Not totally necessary however. For crit racing, we recommend taking one. For road races where it’s easier to warm up on the road, it’s up to you.
Next
Towel or other coverage for changing
Towel or other coverage for changing
You’ll be changing at the race venue most likely, and if not bathrooms are available, being able to wrap a towel around you is nice…for you and everyone else.
We actually use Sport Kilts that we purchased online.
Next
Roll of toilet paper
Roll of toilet paper
You’ll be thanking us if the port-o-john’s run out of TP or if you have to use the woods.
Next
Any other spare tools or parts you may need
Any other spare tools or parts you may need
Multi-tool is generally a must have. All the others are optional.
Next
Day 28 – Race Day!
Day 28 – Race Day!
Pre-Race Schedule
Pre-Race Schedule
- Wake up at a time that will allow you to get in your pre-race meal, put your gear in the car, load your bike, and get to the race 1.5 hours early. I like to have a drink bottle in the car with for the ride to the race to top off on fluids.
- Arrive at race 1.5 hours early and head over to race registration. Make sure you have your money and your annual license. If you do not own an annual license, make sure you have an extra $10 to purchase a one-day USA Cycling license. If possible, always pre-register online. It’s usually cheaper and saves time the day of the event.
- Some races will have different lines based on categories age groups or whether you pre-registered or not.
- Everyone has to sign a waiver which will include personal info for you to fill in. Annual license holders will need to present your license to the person collecting your money and registration/waiver form. Also, for first time racers, racing age is how old you will be on December 31st of the current year.
- Once you pay, sign the waiver, and present your license (annual or the one day you have just completed), you will receive your race number. There should be race pins for attaching your race number to your jersey. Make sure to ask which side of the jersey to place this race number as it needs to be on the correct side so the finish line officials are able to score you as you come across that line for the victory!
- If you have a spare set of wheels for the wheel truck (road race), ask where your races wheel truck is located and take your spare set over. If it’s a crit, ask where the pits are at.
- For some, nature break number 1 (or more) hits by now – this is why you arrived early. Good thing you got there 1.5 hours early and now you have time to take care of nature breaks.
- Change into your race clothes, utilizing your towel or kilt that you packed the night before. (If you live nearby, you may want to have this on already)
- Make sure you check the air in your tires now so you have plenty of time to change a flat that may have randomly occurred overnight. Top off to your preferred psi.
- Find your teammates (if you have any) and pre-ride part of the course to get warmed up. Ideally you should shoot for a 20-30 minute warm up. MAKE SURE YOU HAVE YOUR HELMET ON.
- Arrive back to the start with 15 minutes to spare and top off your water bottles that you were likely sipping on during your warm-up.
- By now you should start hearing officials calling the racers for the upcoming race to the starting area. Be alert…you don’t want to miss the start.
- Listen to the officials who will be giving out important information about the race and the course. They will tell you when it is “go time!”
- Have fun and be safe! Remember, “Chamois time is hammer time!”
Next
Pre-race warm-up
Pre-race warm-up
Workout Duration: 20 to 30 minutes
Workout Description:
– 5-15 min spin, gradually lifting to L2 endurance effort
– 3×1 min fast spins (100+ cadence) with 1 min recovery
– 4 min easy spin
– 2-4×1 min high cadence threshold effort with 2 min recovery
– 4-6x15s spin up to race efforts with 45s to 90s recovery
Rock and roll!
Workout Notes:
Use a separate drink bottle during warm-ups so you don’t deplete those for your race. Use an ice sock if temps are high to keep core temperature down. You should not be maxing out on any of these efforts, just getting the body primed and ready to rock!
If you are warming up on the road, just follow this as best as possible. Does not have to be perfect.
Next
Race time! Grip and rip
Race time! Grip and rip
Race smart then race hard! Remember, it’s not the person who works the hardest that usually wins. Instead, conserve that energy until it matters most, then dig deep and enjoy the fun that comes from competition and testing your limits.
Just a reminder – DO NOT NEGLECT NUTRITION.
And a final reminder – Remember your Mental Checklist when the going gets tough.
Lastly, have fun out there!
Complete Course